PHP Composer Autoloading

Tired of manually including class files in your PHP projects? This guide provides a step-by-step walkthrough of setting up PHP Composer autoloading with the PSR-4 standard. Learn how to simplify dependency management and achieve efficient class loading for cleaner, more maintainable code.
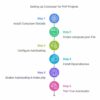
PHP Composer Autoloading: A Step-by-Step Guide
Install Composer
Step 1:
You need to have Composer installed globally on your system.
If you haven’t installed Composer yet, download and install it from:
🔗 https://getcomposer.org/
Step 2:
✅ There are 2 ways to create composer.json:
one is manually, other is Command Line.
📝 Manually:
Create a composer.json file in your project root:
Example: /your-project-root/composer.json
💻 Command Line:
Run the following command in your project’s root directory:
composer init
Step 3:
Configure Autoloading in composer.json:
Open your composer.json file and add an autoload section.
This section tells Composer how to map namespaces to directories in your project.
The most common approach is using the psr-4 standard.
Here’s an example composer.json with a basic autoload configuration:
{
“name”: “BluFashionBD/mvc-framework”,
“description”: “A learning project to build a simple PHP MVC framework.MVC”,
“type”: “project”,
“license”: “MIT”,
“require”: {
“php”: “^7.4 || ^8.0”
},
“autoload”: {
“psr-4”: {
“App\\”: “app/”
}
},
“minimum-stability”: “dev”,
“prefer-stable”: true
}
Update Your Namespaces and Directory Structure
Ensure that your project’s directory structure and namespaces are consistent with the psr-4 configuration in your composer.json file.
For example, if you have psr-4″: { “App\\”: “app/” } and a class App\Controllers\HomeController, the file must be located at app/Controllers/HomeController.php.
Explanation
“App\\”: “app/” maps the App namespace to the app/ directory.
So App\Controllers\HomeController loads from app/Controllers/HomeController.php
Step: 4
Install Dependencies and Generate Autoloader:
Run the following command in your project’s root directory:
composer install
✅ What Happens When You Run “composer install”?
💡 Step 1: Composer reads the composer.json and composer.lock files to check the required dependencies.
⬇️ Step 2: It downloads and installs all the necessary packages listed in composer.json.
📁 Step 3: If the vendor folder doesn’t exist, Composer will automatically create it.
⚙️ Step 4: Inside the vendor folder, Composer generates an autoload.php file.
This file helps in loading classes automatically without requiring manual include or require.
🚀 Done! Your dependencies are installed, and your project is ready to use! 🎉
Step: 5
If your entry point is index.php, add the following line at the top of public/index.php:
<?php
require __DIR__ . ‘/../vendor/autoload.php’; // For projects where ‘vendor’ is in the root folder
This enables PSR-4 autoloading, so you don’t need to manually require class files.
Step: 6
Test Your Autoloader
Create a new PHP file and try to use a class from your project
If the autoloader is working, the class should load automatically without manual inclusion.
For example:
use App\Controllers\HomeController; // Assuming you have this class
$homeController = new HomeController();
$homeController->index(); // Call a method on the controller
Important
autoload.php Path: Ensure the path to vendor/autoload.php in index.php is correct (typically ../vendor/autoload.php if index.php is in the public directory).
Namespace Consistency: Verify namespaces in your code match your directory structure for proper autoloading.
composer.json Paths: Confirm file paths in composer.json are accurate.
Backup: Create a project backup before proceeding.
#PHP#Composer#PHPComposer#Autoloading#PSR4#PHPAutoloading#PHPDependencyManagement#ComposerTutorial